
How to Test Google Ad Manager (DFP) Setup?
Google Ad Manager offers ad testing to publishers so that they can manage their ad inventory more efficiently. The ability to create user-friendly ads depends on experimentation with different ad formats, sizes, and placements.
Ad campaigns overall consist of multiple elements such as advertisers, line items, orders, key-values, placements, etc., so it’s essential for publishers to understand and analyze the performance of these elements and avoid potential errors.
In this article we’ll explain how to test your Google Ad Manager setup and share some beneficial tools to simplify this process!
A Brief Intro to Google Ad Manager
Google Ad Manager (GAM) was introduced in June 2018, when Google decided to combine its previous advertising platforms–DoubleClick for Publishers (DFP) and DoubleClick Ad Exchange (AdX).
GAM provides granular controls and supports multiple ad exchanges and networks, including Google AdSense and Ad Exchange, as well as third-party networks and exchanges. GAM also supports a variety of delivery channels, such as video, smart TV, desktop, and mobile.
What is Google Ad Manager?
Google Ad Manager is an ad management platform that’s primarily used to elevate the ad experience and optimize ad campaigns for digital publishers.
It offers multiple features, including programmatic advertising, ad serving, and ad management, which makes it appealing to most publishers and advertisers. It provides a user-friendly interface, reporting capabilities, and integration with other Google products.
GAM enables to manage and serve ads to multiple audience locations from a single platform. It helps advertisers and publishers to analyze ad revenue and improve ROI through comprehensive and insightful reports.
Importance of Google Ad Manager in digital advertising
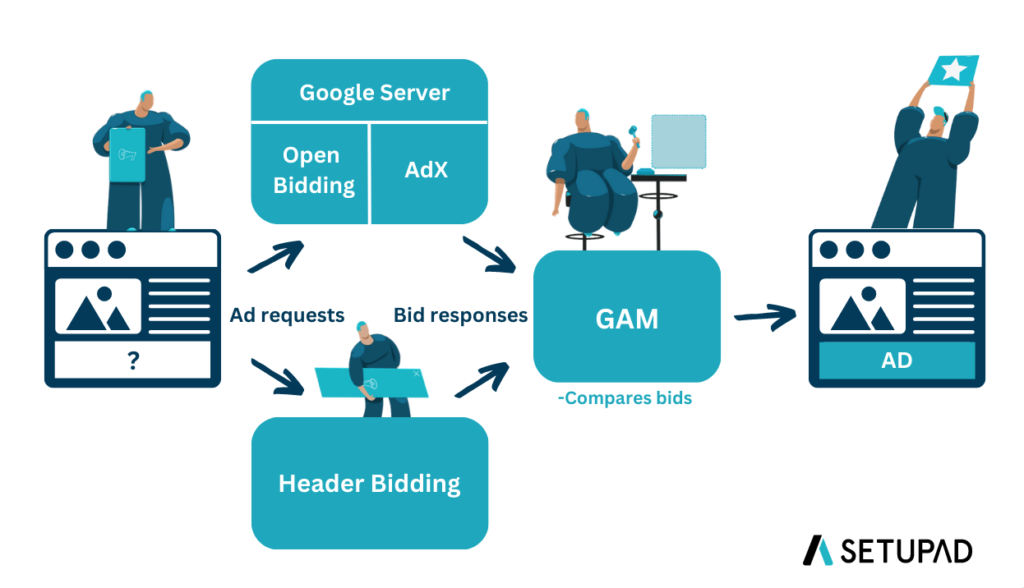
Google Ad Manager simultaneously runs a unified auction between Ad Exchange, Open Bidding, and header bidding–the highest bid received before the timeout from all platforms combined wins the impression.
Why Do You Need to Test the Google Ad Manager Setup?
Ad testing is a process that enables publishers to test ads and analyze how they perform before putting them live on their websites. It ensures that the ads function properly, and enables publishers to determine what needs to be improved to deliver a better user experience.
Here are the 4 main reasons why you should test your GAM setup:
1. Ensuring accurate ad delivery
One of the primary reasons to test the GAM setup is to ensure accurate ad delivery. Publishers rely on GAM to serve ads to their audiences, and misconfigurations or technical issues can disrupt the delivery process.
By testing the setup thoroughly, publishers can verify that the ads are being delivered as intended, reaching the right users at the right time. This helps to maintain trust with advertisers and ensures the publisher’s monetization efforts aren’t compromised.
2. Optimizing performance and revenue
Testing the GAM setup enables publishers to identify areas where performance can be optimized. By analyzing different ad formats, sizes, placements, and targeting options, publishers can gather valuable insights into what works best for their specific audience and website.
3. Avoiding revenue leakage
Revenue leakage can occur if the setup isn’t thoroughly tested. This refers to situations where potential ad impressions go unsold or aren’t properly monetized.
By conducting tests, publishers can ensure that their ad inventory is correctly set up and that all available impressions are being effectively used. Testing can help identify discrepancies, such as ad tags not working correctly or incorrect placement configurations, which might lead to revenue loss.
5. User experience and website performance
An improperly configured GAM setup can negatively impact user experience and website performance. Slow-loading ads or broken ads, or ad formats that disrupt the content flow can frustrate users and lead to higher bounce rates.
Testing the setup helps publishers to identify and solve or even avoid these issues, ensuring a smooth and engaging user experience. By optimizing the ad delivery process, publishers can strike a balance between monetization and user satisfaction, resulting in increased visitor retention and engagement.
Pre-Testing Checklist
The pre-testing checklist for GAM can help publishers ensure that their ad-serving platform is properly configured before launching ad campaigns.
Google suggests 3 best practices to begin with to test your implementation effectively:
- Check if everything is correct with your GAM settings. You should check if your system is capable of testing. Simply review your GAM settings and confirm that they validate ad delivery and provide proper reporting. The more complex the campaign, the more useful early testing can be.
- Test for a variety of site usage. Make sure that your tests cover different devices and browsers, as users can access your site using different ways.
- Include third-party integrations. You should include systems outside of the GAM interface, such as order management systems, yield management, business intelligence or any third-party reporting tools. They could provide additional testing recommendations.
Ad tag implementation
You need to verify that the ad tags are correctly implemented on all relevant pages of your website or app, and ensure that they’re placed in the appropriate locations to maximize visibility and performance.
You should also check for any issues with the ad tags, such as missing or broken tags.

Targeting and inventory settings
You should review your targeting settings, including audience, geographic, and device targeting, to ensure they align with your advertising goals.
Confirm that inventory settings, including ad unit sizes, formats, and placements, are accurately defined, and double-check any restrictions or exclusions you have set up to avoid accidentally blocking or limiting ad delivery.
Header bidding or exchange integration
If you are using header bidding or working with external exchanges you need to verify that the integration is properly implemented–test the connection between GAM and your header bidding partners or exchanges to ensure seamless communication and accurate bid responses.
Creatives and ad formats
You should always check that the creative assets (e.g., images, videos, or HTML5) are uploaded correctly and are associated with the appropriate ad units.
Don’t forget to test different ad formats (e.g., display, native, video) to confirm that they’re displayed correctly and are visually appealing.
Frequency capping and delivery rules
Review your frequency capping settings to avoid excessive ad repetition for users and ensure a balanced ad experience.
You should also check that delivery rules and priority settings are correctly configured to control how ads are served and prioritize specific campaigns or advertisers.
Third-party verification and viewability measurement
If you are working with third-party verification vendors or viewability measurement tools, confirm that the integrations are functioning correctly. Test the data collection and reporting mechanisms to ensure accurate ad viewability measurement and other metrics.
Ad quality and compliance
It’s important that you ensure compliance with ad quality standards, such as avoiding any type of ad fraud. Always test your website or app for any ad-related issues that could negatively impact user experiences, such as slow-loading ads or disruptive formats.
Be sure to follow Better Ads Standars to ensure a good user experience on your site.
Analytics and reporting
Last but not least–check that the GAM reporting and analytics features are properly set up. Verify that data tracking and reporting are functioning accurately to provide insights into ad performance and revenue.
Testing the Setup
First, you need to set up your testing environment, which includes test objects (e.g., advertisers, ad units, orders, line items, creatives), so it’s easier to keep them separate from your real campaigns.
You should create a testing page. This will help you understand the effects of the test objects on a test environment without affecting your real website.
Test object creation in GAM
Create as many test objects as required, but you should use a simple and recognizable naming pattern for all test objects to easily identify them and keep them grouped together.
You also need to create test advertisers. These advertisers can’t be deleted, but you can change their status to inactive or add multiple “Z’s” to their name to push them to the bottom of your advertiser’s list.
Then, create ad units that you would want to add to your site.
Tips for generating test data
Once you are done creating test items, you’ll also need test data. For that, you need to generate test impressions on your ad units to check the delivery of ads.
Here are 3 main tips for generating test data:
- Use different IP addresses to generate impressions and see how your ads are delivered by the test objects in GAM. Repeat the process using different devices and browsers.
- Refresh the page every 4 seconds to see if the ads are being replaced by a new ad.
If you’re refreshing ads rapidly it may trigger the spam filtering in GAM. If this happens you should adjust your “Manual” or “Automated” refresh rate.
Whatsoever, if you’ve enabled ad refresh then simply stay on the page to see if the ads are getting refreshed.
- Keep an eye on the page loading speed to make sure that it’s not affected.
How to test ad creatives?
GAM has multiple trafficking features for ad creatives such as frequency capping, ad exclusion labels, roadblocking, etc.
Ad creatives can influence both the user experience on your site and the brands that deliver ads, therefore it’s important to test the creatives before adding them to an active order line item.
You should add 3-4 creatives and check if they’re rendering correctly across all devices. If an ad creative isn’t rendering, you need to contact advertisers for the creatives that work properly.
- Use the GAM “Preview” feature to see how the creatives look on your site.
Additionally, if you’re serving out-of-page ads (e.g., interstitial ads), follow coalition of better ads guidelines while selecting the ad format, and ensure that you’ve updated Google Publisher Tag on your site for rendering those ads.
How to test ad tags?
Ad tags are responsible for initiating the process of delivering the ad to the users. They play an important role in the functioning of ad units on a website, therefore it’s essential to test the ad tags.
To begin the testing you should generate ad tags in GAM and place them in the desired location–in the <head> and the <body> code blocks
Afterward you should visit the test page from different browsers (e.g., Safari, Chrome, etc.), operating systems, and devices to see if the ad calls are made properly.
How to test line items?
Line items contain information about how specific creatives are intended to serve on your website, as well as pricing and other delivery details.
Here are the 4 main steps to test line items in Google Ad Manager:
- Sign in to GAM.
- Navigate to Delivery, then click on Line items.
- Use filters to find and select the line item that isn’t delivering.
- Select the line item’s Troubleshoot tab.
GAM displays the most important reasons why a line item didn’t deliver to eligible ad requests for each line item and any recent changes that might impact the delivery.
You can also view any recent changes made to the line item’s settings, historical forecasts generated for the line item, and other significant peaks or dips in delivery in the “Health history” area.
Verifying delivery and reporting in GAM
You can use the delivery tools in GAM to see additional information about the delivery process. Check the Delivery and Inventory sections in GAM to review the number of impressions served, ad fill rates, and any discrepancies or under-delivery issues.
Additionally, the webpage ads inspector enables you to see which ads are delivered, troubleshoot them and understand the ad selection process. It also enables you to see if your creatives or line items are set up correctly, as well as spot any issues with them.
For reporting, you can use GAM reports to evaluate the performance of your ads and see what can be improved. GAM’s reporting function also offers advanced forecasting and revenue optimization, therefore it’s an essential tool for your GAM setup optimization.
You can create custom reports to track key metrics such as impressions, clicks, click-through rates (CTR), conversions, and revenue.
Then, review the performance data, including overall campaign performance, individual ad units, ad sizes, or targeting criteria, to identify trends and areas for optimization.
Additional Testing Methods
You should run tests on different layouts of your web properties (including those that are optimized for your mobile devices) to make sure that the ad tags are working properly.
Chrome DevTools
Use Chrome DevTools to observe the timeline and make sure that the GAM tags aren’t causing page latency or other issues. You can monitor how GAM tags render on your pages and how they interact with your website.
Google Publisher Console
Use the Google Publisher Console (GPC) to test ad tag performance and avoid errors. It’s a tool for GAM users to troubleshoot and diagnose ad delivery problems.
GPC offers an interconnected platform that helps to find any possible line item errors.
Simply put, if you experience JavaScript issues or line items’ delivering errors in GAM, then GPC is your solution.
As a GAM tool, it also requires adding Google Publisher Tags (GPT) to the webpage. GPT is Google’s ad tag library that generates dynamic ad requests on the publisher’s page. This code helps Google Publisher Console to scan the page for ad delivery-related errors.
Google Ad Manager “Opportunities and Experiments”
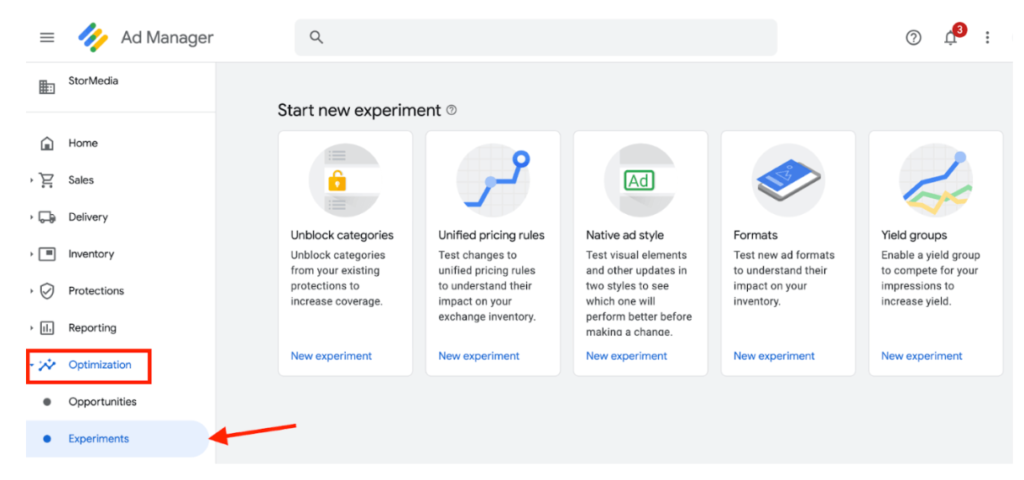
Use the Google Ad Manager self-service feature “Opportunities and Experiments”, which can be found within the dashboard under the Optimization tab.
GAM uses machine algorithms to suggest opportunities and experiments based on trends and data from across your network. This feature enables you to see how a change to a GAM rule or setting could impact your current or future revenue.
Manual Experiments on GAM
You can run a manual experiment using your own criteria to see how changes can impact your network. The experiment runs on a percentage of your network’s actual traffic to test how these settings will impact your revenue.
Manual Experiments builds on the “Opportunities and Experiments” tool.
GAM’s Manual Experiments simplifies the inventory testing process by providing publishers flexibility and control to quickly create and run experiments directly in the platform and analyze the results.
Additionally, it’s easy to implement because the tests are built into Google’s existing experiment framework in GAM. You need to choose from one of the available experiment types, configure the amount of traffic to experiment with, and set the test duration.
After the experiment, you can review its performance and decide if you want to implement the change with one click.
Worth to note that the manual experiments that were implemented by publishers during the beta period achieved a 6.5% lift in revenue on average.
- To see a list of all the available manual experiment types and view your active experiments, you need to click on Optimization, and then Experiments.
Previewing ads in Google Ad Manager
You can simply preview how the ad creative will appear on your site by using the preview feature. To do this you need to take these 6 steps:
- Sign in to GAM.
- Navigate to the details page of the line item that has the creative you want to preview. Click Delivery, then Line items and use filters or browse.
- From the details page of a line item, click the Creatives tab.
- Find the creative you want to preview among the list of creatives and click its name.
- Click the Preview tab.
- Click On site and enter the site URL of the page containing the video player capable of showing the ad.
Important to note, that the preview option doesn’t work for creatives with size overrides. The size in the tag must match the size of the preview creative.
Native video, Dynamic Ad Insertion, and Programmatic Direct doesn’t support the ad creative preview currently.
Conclusion
Ad testing in Google Ad Manager is essential for publishers that want to optimize their ad operations and maximize revenue. It enables publishers to fine-tune their strategies, improve ad performance, and build strong relationships with advertisers.
By investing time and resources into testing the GAM setup, publishers can position themselves as reliable partners in the ad tech industry, offering advertisers and users a seamless and efficient advertising experience.
Your ads may be good enough to prevent policy violations in GAM, but if you want incremental growth, there’s always room for customization and experimentation. By continuously monitoring your setup, optimizing performance, and staying compliant, publishers can unlock the full potential of their ad inventory and achieve long-term success in the ever-changing world of ad tech.