Ad Code Implementation Guide
Introduction
This guide will help you understand and implement different types of ad integration codes on your website.
What is H/B (Head/Body)?
The H/B code is divided into two parts:
- Head Part: Defines the ad units and settings, placed within the <head></head> section of your HTML document.
- Body Part: Specifies where the ads should be displayed and placed within the <body></body> section of your HTML document.
When to Use H/B
Use the H/B code when:
- Your website has a consistent layout across all pages;
- You want to reduce ad loading times;
- You need precise ad targeting for different screen sizes;
- You prefer a straightforward integration directly into your website’s code.
Simple Code Example
Head Code
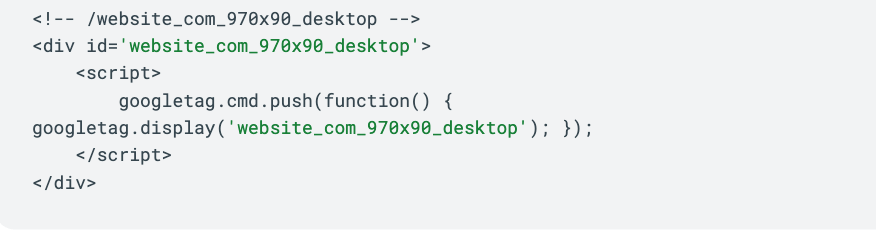
Body Code
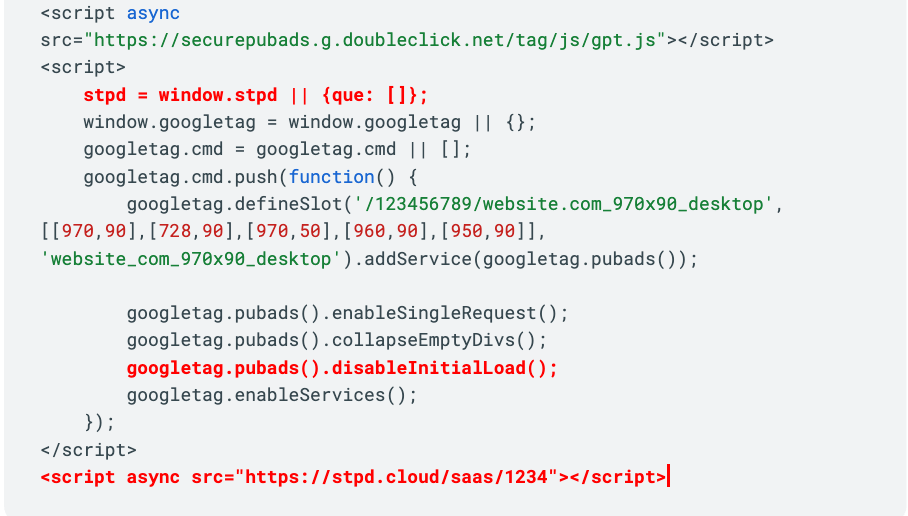
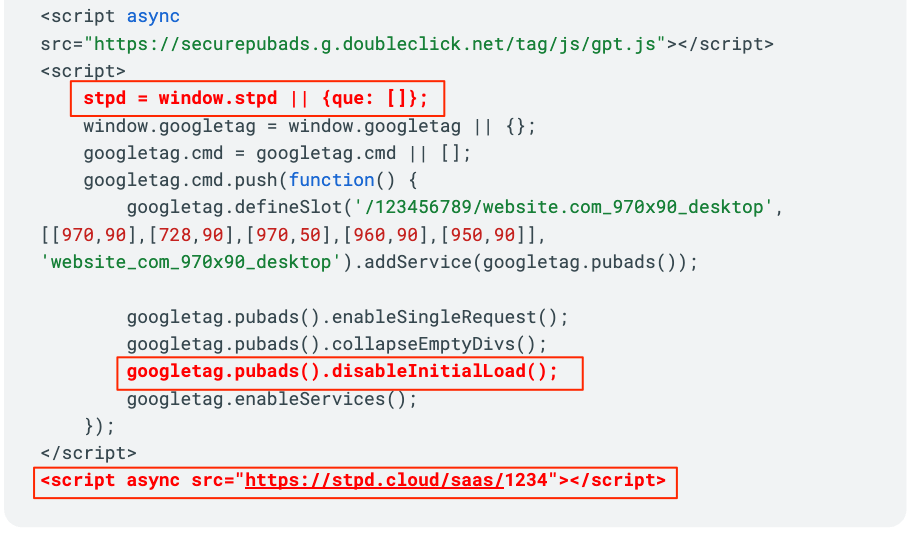
*If you are already running Google Ad Manager GPT (head/body) tags make sure that only these extra lines are added:
Explanation
- stpd = window.stpd || {que: []}; – This line prepares the (Prebid) object. It ensures that if any commands are run before the script loads, they will be queued and executed as soon as the script is ready.
- googletag.pubads().disableInitialLoad(); – This line pauses the Google Publisher Tag (GPT) process, allowing Prebid to execute first. Without this line, GPT would automatically initialize all ad units using only Google Ad Manager (GAM), bypassing the Prebid setup.
- <script async src=”https://stpd.cloud/saas/1234″></script> – This script includes all the important information needed for your ads to work properly. It sets up the ad units, connects to various SSPs, manages timeouts, and ensures the correct sizes and settings for each ad. Without this script, the Prebid part will not function.
What is W/B (Wrapper/Body)?
The W/B code format involves placing a single script in the <body></body> section of your website’s HTML. This method provides more granular control over each ad unit.
When to Use W/B
Use the W/B code when:
- You need individual control over each ad unit’s settings, such as timeouts and refresh rates;
- Your website has diverse and varying layouts across its pages;
- You want to conduct A/B tests to optimize ad performance;
- You need flexibility in integrating ad units with other ad servers.
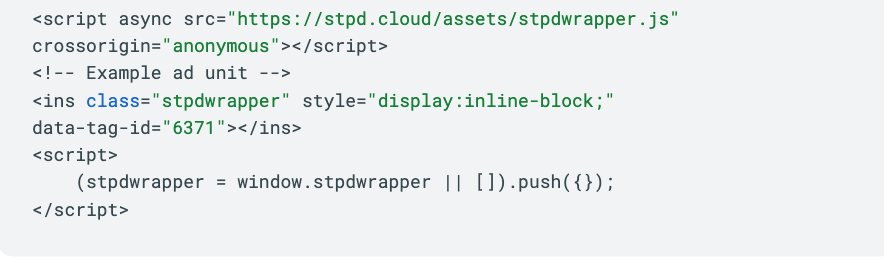
Simple Code Example
Other frameworks
Next.js and React.js
Detailed information and usage instructions for integrating codes into Next.js and React.js frameworks can be found here.
PHP
To integrate Setupad ads into a PHP-based website, you can follow this example on Gist.
For more information on setting up and configuring Setupad Header Bidding Setup, refer to the Setupad Header Bidding Setup documentation.
Implement Codes Using WP Plugin
To implement Setupad ad codes using the WP Plugin, follow these steps. You can watch a detailed video tutorial or read the full documentation for more information.
Device Targeting
H/B
When using the H/B code, device targeting is not automatically applied. To ensure that ads are displayed optimally on different devices, you need to adjust the Head code to target specific screen widths. This ensures that ads fit well on various screen sizes, providing a better user experience across different devices.
Example
Here is an example of H/B code with screen width targeting:
<!-- HEAD PART OF THE HTML -->
<script async src="https://securepubads.g.doubleclick.net/tag/js/gpt.js"></script>
<script>
window.googletag = window.googletag || {cmd: []};
googletag.cmd.push(function() {
if (window.innerWidth > 1000) {
googletag.defineSlot('/123456789/setupad.com_ad_unit_1_desktop', [[970,90]], 'setupad_com_ad_unit_1').addService(googletag.pubads());
} else if (window.innerWidth > 727) {
googletag.defineSlot('/123456789/setupad.com_ad_unit_2_tablet', [[728,90]], 'setupad_com_ad_unit_2').addService(googletag.pubads());
} else {
googletag.defineSlot('/123456789/setupad.com_ad_unit_3_mobile', [[300,250]], 'setupad_com_ad_unit_3').addService(googletag.pubads());
}
googletag.pubads().enableSingleRequest();
googletag.pubads().collapseEmptyDivs();
googletag.pubads().disableInitialLoad();
googletag.enableServices();
});
</script>
<script async src="https://stpd.cloud/saas/1234"></script>This code checks the screen width and defines ad units accordingly:
- Desktop ad unit for widths greater than 1000px;
- Tablet ad unit for widths between 728px and 1000px;
- Mobile ad unit for widths less than 728px.
W/B
For W/B code, device targeting can be easily managed via the Prebid panel settings. You can specify whether an ad unit should target all devices, desktop, mobile, or tablet.
Example
Here is an example of how to configure W/B code device targeting through the Prebid panel:
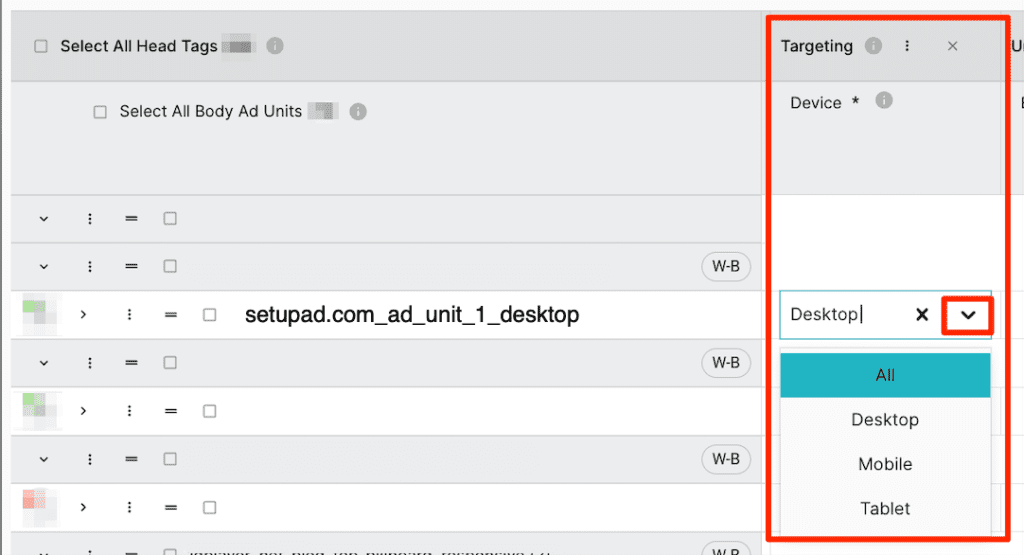
By using these methods, you can ensure that your ads are appropriately targeted and displayed on various devices, enhancing the overall user experience and ad performance.
Lazy-Loading
H/B
Lazy-loading improves page performance by loading ads only when they come into the user’s view. For H/B code, lazy-loading scripts must be positioned before the main Google Publisher Tag (GPT) scripts in the <head> of your document.
Here’s how you can set up lazy-loading for H/B code:
1. Include Lazy-Loading Scripts in the Head Section
<script src="https://stpd.cloud/assets/libraries/inview.min.js"></script>
<script>inView.offset(-200);</script>2. Defining Ad Units in the Body Section
It’s crucial to define lazy-loaded ad units within the <body></body> section, not in the Head code, to ensure proper functionality.
Example
<!-- BODY PART OF THE HTML -->

<div id='setupad_com_ad_unit_1'>
    <script type="text/javascript">
        inView('#setupad_com_ad_unit_1').once('enter', (function() {
            googletag.cmd.push(function() {
                if(window.innerWidth > 1000) {
                    googletag.defineSlot('/123456789/setupad.com_ad_unit_1', [[300,250]], 'setupad_com_ad_unit_1').addService(googletag.pubads());
                    googletag.display('setupad_com_ad_unit_1');
                    stpd.initializeAdUnit('setupad_com_ad_unit_1');
                }
            });
        }));
    </script>
</div>In this example, the ad unit setupad_com_ad_unit_1 will only load when it comes into view as the user scrolls down the page. This setup ensures that the ads do not affect the initial loading time of the page, enhancing overall performance.
Screen Width Targeting
The method for screen width targeting is the same as described in the device targeting section. Adjust the ad definitions based on the screen width to ensure that ads are well-proportioned across different devices.
Lazy-Loading Repeatable Ad Code Example
This code allows you to place the same ad unit code multiple times on a single page, which can be particularly useful for pages with multiple ad placements.
<div class="setupad_lazy_load_repeatable">
<div style="text-align:center;">
<div id='setupad_com_ad_unit_1' style="text-align: center;">
<script type="text/javascript">
setTimeout(function () {
var randomiser = (Math.random() + 1).toString(36).substring(7);
var adID = document.querySelector('#setupad_com_ad_unit_1').id = "stpd-" + randomiser;
inView('#' + adID).once('enter', (function() {
googletag.cmd.push(function() {
if(window.innerWidth >= 1000) {
googletag.defineSlot('/123456789/setupad.com_ad_unit_1_desktop', [[300,250]], adID).addService(googletag.pubads());
} else {
googletag.defineSlot('/123456789/setupad.com_ad_unit_1_mobile', [[300,250]], adID).addService(googletag.pubads());
}
googletag.display(adID);
stpd.initializeAdUnit(adID);
});
}));
}, 60);
</script>
</div>
</div>
</div>Important Guidelines
Follow the general rule of placing the lazy-loaded ad unit definitions within the <body></body> section of your HTML. In the <head></head>, remember to include only the lazy-loading scripts.
<script src="https://stpd.cloud/assets/libraries/inview.min.js"></script>
<script>inView.offset(-200);</script>- Customize the ad unit paths (
'/123456789/setupad.com_ad_unit_1_desktop'and'/123456789/setupad.com_ad_unit_1_mobile') to match those you have in your Google Ad Manager account. - Adjust the ad sizes (
[[300,250]]) to match the dimensions of the ads you intend to serve on your site. - While the code automatically generates a unique id, publishers may need to customize the initial
div id('setupad_com_ad_unit_1') to align with their naming conventions or requirements. - The
divclass ('setupad_lazy_load_repeatable') can be customized to include specific styling that prevents Cumulative Layout Shift (CLS). This is achieved by defining styles within the<style></style>section of your HTML. Learn more about it in the next section of this documentation.
By following these guidelines and using the provided code, you can effectively implement multiple lazy-loaded ad units on the same page, enhancing both user experience and ad performance.
W/B
For W/B code, device targeting can be managed via the Prebid panel. However, lazy-loading requires adding specific attributes to the body code manually. There is no need to place extra scripts or lines in the head section of your HTML document.
Example
Here is an example of how to set up lazy-loading for W/B code:
<script async src="https://stpd.cloud/assets/stpdwrapper.js"
crossorigin="anonymous"></script>
<!-- Example ad unit with lazy-loading enabled -->
<ins class="stpdwrapper"
style="display:inline-block;"
data-tag-id="6371"
data-lazyload="true"
data-lazyloadMargin="200px"></ins>
<script>
(stpdwrapper = window.stpdwrapper || []).push({});
</script>In this example:
- data-lazyload=”true”: Enables lazy-loading for the ad unit;
- data-lazyloadMargin=”200px”: Sets the offset, so the ad starts loading when it’s 200px away from being fully visible. Adjust this value as needed.
By adding these lines, you enable lazy-loading for your ad units, ensuring they load only when they come into view, which helps improve page load times and overall user experience. Device targeting settings can still be configured in the Prebid panel.
Cumulative Layout Shift (CLS)
What is CLS?
Cumulative Layout Shift (CLS) measures the visual stability of a webpage. It indicates how much a webpage unexpectedly shifts while it loads. A high CLS score occurs when elements like banners load and cause the page content to move unexpectedly, disrupting the user experience.
Why Use It?
Preventing CLS is essential to maintain a smooth and stable user experience. High CLS scores can lead to poor user satisfaction as content shifts unexpectedly. By defining the width and height of ad banners, you can avoid these shifts and ensure a stable layout, which also helps to avoid penalties such as the Confirmed Click Penalty.
H/B Example with CLS Prevention
To prevent CLS for H/B code, define the height of ad units in the CSS within the head section:
<!-- HEAD PART OF THE HTML -->
<script async src="https://securepubads.g.doubleclick.net/tag/js/gpt.js"></script>
<script>
window.googletag = window.googletag || {cmd: []};
googletag.cmd.push(function() {
if (window.innerWidth > 1000) {
googletag.defineSlot('/123456789/setupad.com_ad_unit_1_desktop', [[970,90]], 'setupad_com_ad_unit_1').addService(googletag.pubads());
} else if (window.innerWidth > 727) {
googletag.defineSlot('/123456789/setupad.com_ad_unit_2_tablet', [[728,90]], 'setupad_com_ad_unit_2').addService(googletag.pubads());
} else {
googletag.defineSlot('/123456789/setupad.com_ad_unit_3_mobile', [[300,250]], 'setupad_com_ad_unit_3').addService(googletag.pubads());
}
googletag.pubads().enableSingleRequest();
googletag.pubads().collapseEmptyDivs();
googletag.pubads().disableInitialLoad();
googletag.enableServices();
});
</script>
<script async src="https://stpd.cloud/saas/1234"></script><style>
@media (min-width: 728px) {
.setupad_com_ad_unit_1, .setupad_com_ad_unit_2 {
height: 90px !important;
}
}
@media (max-width: 727px) {
.setupad_com_ad_unit_3 {
height: 250px !important;
}
}
</style>W/B Example with CLS Prevention
<script async src="https://stpd.cloud/assets/stpdwrapper.js"
crossorigin="anonymous"></script>
<!-- Example ad unit -->
<ins class="stpdwrapper"
style="display:inline-block;"
data-tag-id="6371"></ins>
<script>
(stpdwrapper = window.stpdwrapper || []).push({});
</script>
<style>
@media (min-width: 1000px) {
.stpdwrapper[data-tag-id="6371"] {
height: 250px !important;
}
}
</style>Description of Style Elements
In both examples, the CSS styles are used to define the height of the ad units to prevent CLS:
- height: px !important;: This sets the height of the ad units to defined pixels and uses the !important flag to ensure this style is applied, preventing any unexpected layout shifts when the ads load;
- @media (max-width or min-width: px): This media query adjusts the height for smaller/larger screens (e.g., desktop/tablet/mobile devices), setting the height to defined pixels with !important to ensure the style is enforced.
By defining these styles, the layout remains stable as the ads load, preventing shifts and ensuring a better user experience
Ad Formats
In addition to standard static display banners, several other ad formats can enhance the user experience and increase ad visibility. These formats often require custom code adjustments. The ad units are created in the Prebid Panel, but the final code placed on the website is adjusted to achieve the desired functionality.
Anchor

Intro: An Anchor is an overlay ad that stays fixed at the bottom or top of a webpage while the visitor scrolls through the page. It is a highly effective format for maintaining visibility without intruding on the user experience.
Why Use It: Anchor is great for consistent visibility, thus increasing the overall ad viewability of the website. They are always in view, making them effective for branding and call-to-action messages.
Settings to Use: All settings for Anchor, such as stickiness, background opacity, padding, and more can be defined in the Prebid Panel. No code changes are required for this format.

* Hover over the Tooltips to learn more about each setting and what it does.

Recommended Sizes:
- Desktop sizes: 1000×100, 980×90, 970×90, 728×90;
- Mobile sizes: 320×100, 300×100, 320×50, 300×50.
Sticky Sidebar

Intro: A Sticky Sidebar is a regular ad placed in the desktop sidebar that remains visible as the user scrolls down the page.
Why Use It: Sticky Sidebars ensure high visibility as they stay in a fixed position, making them high-value inventory.
Settings to Use: Custom code adjustments are needed to make a Sidebar ad sticky.
Recommended Sizes:
- Desktop sizes: 300×600, 160×600, 120×600.
Double Banner
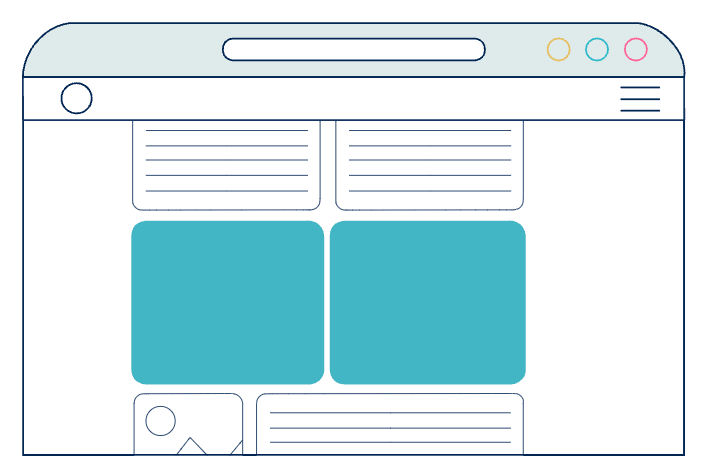
Intro: Double Banner ads consist of two ad units placed side by side or one above another. They can include sizes such as 300×250, 336×280, 336×336, and others.
Why Use It: Placing two ad units next to each other in a compact area increases the chances of engagement and advertiser interest.
Settings to Use: Custom code adjustments are needed.
Recommended Sizes:
- Desktop sizes: 300×250, 336×280, 336×336;
- Mobile sizes: 300×250, 336×280, 336×336.
Side Rails

Intro: Side Rail ads are typically larger ads placed on the sides of the main content area of a webpage. They are effective for high visibility without disrupting the content flow.
Why Use It: Side Rails ensures that ads remain visible as users scroll, providing a constant presence on the page.
Settings to Use: Custom code adjustments are needed.
Recommended Sizes:
- Desktop sizes: 300×600, 160×600, 120×600.
Additional Information
All the formats available from Setupad can be found here.
For help with adjusting codes for specific formats, a Support Ticket can be created in the Prebid Panel.